PLEASE READ ALL INSTRUCTIONS THOROUGHLY BEFORE USING THIS PRODUCT. The information below lists customer support topics for your LightWaterLife relief kits. If you have specific questions, please email our Customer Support Team at support@lightwaterlife.com.
International Customer Support
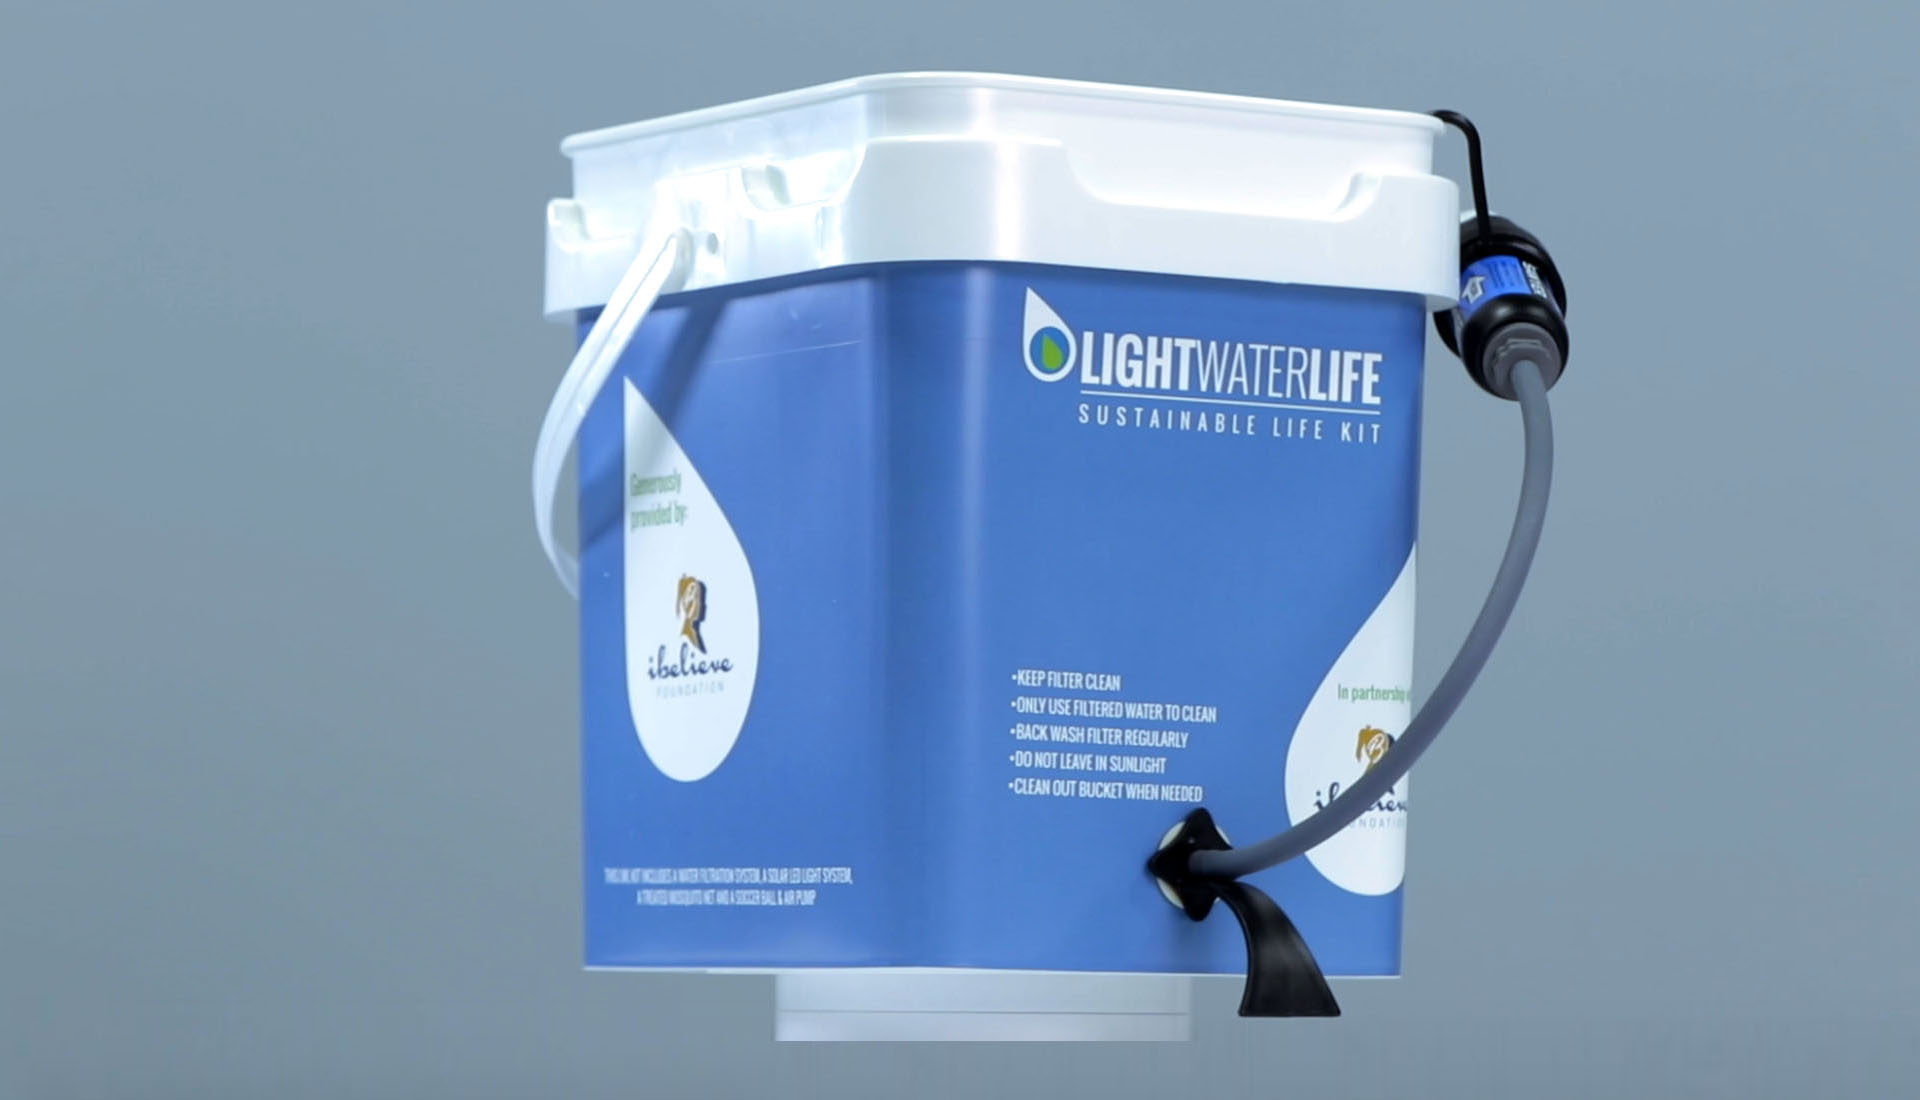
Step-by-step instructions for international productsSawyer® Water Filtration System
Quick Start Guide

Insert filter attachment (threaded side first) into hole from the outside of the bucket.

From inside the empty bucket, use the provided washer and bolt to fasten. Turn the washer by hand and do not over tighten.

Fill bucket. Point the filter downward below the bucket. Water flows using gravity. For better flow rate, loosen bucket lid to avoid vacuum pressure.

After use, close lid and hang filter on bucket. Keep out of direct sunlight. Regularly clean filter using back flow instructions on side of bucket.
Helpful Hints
- For a better flow rate, fill the bucket completely with water.
- Do not fill the bucket with water that is contaminated with pollutants or chemicals.
- Loosen bucket lids to prevent vacuum pressure.
- The system can filter 500 gallons per day up to 100,000 gallons in a lifetime with proper cleaning and maintenance.
- Backwash water filter with filtered water only daily to ensure good flow rate and cleanliness.
- CAUTION: Do not backwash/clean the filter with contaminated water.
- If the filter is touched or in contact with contaminated hands or surfaces, the filter must be cleaned with filtered water to prevent contamination.
- Store the kit in a dry area that will not be in contact with water.
- ONLY use the bucket to store water. Keep away from children.
Filter Maintenance

To clean the water filter, draw clean, filtered water from a cup into the provided syringe.

Press down on the syringe to push water through the top of the water filter. Repeat until water flow is normal.
Video Instructions
Bucket Filter Assembly – Attaching the filter to the bucket
Filter instructions – Basic instructions on using water filter
Filter maintenance – Backwashing with the cleaning plunger
Filter maintenance – Backwashing with the cleaning coupling
Filter maintenance – Spanish version
Filter maintenance – French version
Sawyer® MINI Water Filtration System
Product Features

1 | High-performance 0.1 Micron absolute inline filter rated up to 100,000 gallons. The MINI filter removes 7 log (99.99999%) of all bacteria (like salmonella) as well as other harmful bacteria which causes cholera and E. coli and 6 log (99.9999%) of all protozoa such as giardia and cryptosporidium. These removal rates equal or exceed other filter options. EPA guidelines allow ten times more protozoa left in the water than Sawyer MINI filters allow. The MINI also filters out 100% of microplastics.
2 | Attaches to included drinking pouch, standard disposable water bottles, hydration packs, or use the straw to drink directly from your water source
3 | Two wires with USB input (5 meter + 3 meter)
4 | 16-ounce reusable squeeze pouch
5 | Cleaning plunger
6 | 7-inch drinking straw
Helpful Hints
- Do not squeeze the pouch too hard or wring the pouch.
- Backwash the filter more often and with more force. It is important that the first backwash is strong so that it cleans out all of the fibers rather than creating paths of least resistance.
- Do not over-tighten the filter on the pouch. Over-tightening can cause the o-rings to embed into the threads or lodge into the opening of the pouch. If the o-ring is out of place the filter may not have a tight seal and water could leak out of the bottom of the filter.
- If your filter is slow or plugged, try backwashing rigorously with hot water (no hotter than 140 degrees F / 10 degrees C). You may need to repeat this several times to unclog the filter. If this doesn’t return the flow to like new, you may have a calcium buildup in the fibers. Soak in vinegar for 1/2 hour followed by rigorous backwashing with hot water (no hotter than 140 degrees F / 10 degrees C). Repeat until the flow returns to normal – it may take several times to get all the way clean again.
- Do not freeze your filter. The filter is safe from freezing temperatures if it has never been used. However, after the fibers are wet there is no definitive way to tell if a filter has been damaged due to freezing. Sawyer recommends replacing your filter if you suspect that it has been frozen, if you are in freezing temperatures, we recommend that you store your filter in your pocket or close to your person so that your body heat can prevent freezing.
- Do not over-chlorinate when sanitizing the filter. It will harm fibers. One pouch capful of bleach to a pouch of water is all that is needed.
Filter Maintenance

To clean the water filter, remove the MINI filter from the tube.

Fill the Cleaning Plunger with clean, filtered water. Place the tip of the Plunger on the output end of the filter.

Forcefully backwash the filter a couple of times with clean water.

Fill the Cleaning Plunger and push water forward through the filter to loosen up any dirt. Repeat backwashing forwards and backwards until the filter is fully cleaned.
Solar Power Lighting System
Quick Start Guide

Insert micro USB into input with the Solar icon to fully charge the lithium battery and ensure the lighting system provides full power immediately.

Insert the wire attached to the solar panel into the input with the Solar icon. Place solar panel in direct sunlight to charge the lithium battery.

Insert LED wires into outputs with Bulb icons. Insert USB wire into output with Phone icon to charge mobile devices. Push ON/OFF button for power.

After hanging LED bulbs to provide maximum light coverage using rub- ber hooks, click switch on each wire to turn lights ON/OFF as needed.
Product Features

1 | Two LED light bulbs (1 x 1W bulb + 1 x 2W bulb)
2 | ON/OFF switches for LED light bulbs
3 | Two wires with USB input (5 meter + 3 meter)
4 | Two phone charging adapters
5 | Charging cord for controller and USB devices
6 | Controller with 3.7V rechargeable lithium battery
7 | ON/OFF button for solar power lighting system
8 | Battery level indicator (1/4, 1/2, 3/4 & full)
9 | Two LED light bulb wire port connections
10 | Mobile device charging port connection
11 | Solar and USB charging port connection
12 | 5V 5.5W monocrystalline silicon solar panel
Helpful Hints
- Charge solar power system with the provided solar panel for at least 6-8 hours a day for recharge to provide 5-7 hours of light at night.
- Do not insert any other USB product into the power unit.
- Store the power unit in a dry location.

Solar Power Bank with LED Flashlight
Product Features

1 | 30000mAh large-capacity power bank with solar panel
2 | 5W wireless charging panel, compatible with multiple iOS and Android devices
3 | Wireless charging indicator light
4 | Built-in charging cables (Micro USB, TYPE-C, Lightning)
5 | 3 LED flashlight modes (Strong/SOS/Strobe)
6 | Micro USB & TYPE-C input ports and 5V/3A USB Quick charge & Type C output ports
7 | Solar indicator light
8 | Battery level indicator (1/4, 1/2, 3/4 & full)
9 | ON/OFF power button
10 | 5V 330mA monocrystalline silicon solar panel
11 | Made of durable ABS material, with IP66 waterproof certification
12 | Hanging ring
Helpful Hints
- Please kindly know that Solar charging is only a backup option. Due to the limitation of solar panel size and the uncertainty of light intensity, the efficiency of solar charging cannot be guaranteed.
- Please make sure the power bank fully charges through Micro USB/TYPE-C cable before traveling.
- Do not place the solar power bank in extreme or harsh environments to avoid danger.
- 5W wireless charging panel compatibility list (partial list): Huawei Mate20 Pro, iPhone X, iPhone XR, iPhone XS/XS MAX, iPhone 12, Samsung GalaxyS9, Samsung GalaxyS9+, Samsung Galaxy S10, etc.
Mosquito Net (LLIN)
Quick Start Guide
Pull back adhesive to unseal the polybag with the long-lasting insecticide-treated mosquito net inside. Do not open the bag with a sharp object (i.e., scissor, knife, etc.) or the mosquito net may tear. Carefully unfold the net on the bed it will cover with the four loops are on top. Hang the mosquito net at a height that allows it to either reach the ground or be easily tucked under the mattress.
Helpful Hints
- Sleeping under a mosquito net is the best way to protect yourself and your family against malaria.
- Ensure that you and your entire family sleep under the mosquito net, every night all year round.
- It is important to hang the mosquito net properly: it must reach the ground so that you can be tucked under the mat or mattress.
- These types of LLINs are long-lasting insecticide-treated, which means the insecticide lasts for the lifetime of the mosquito net. The mosquito net should not be re-treated.
- Wash your mosquito net once a month in plain water and let it dry in the shade.
- Sew any holes in the mosquito net carefully.
- LLINs need to be replaced every 2-3 years.
- The mosquito nets are safe for children and pregnant women and any skin irritations are not serious and will disappear after a few days.
- Keep mosquito net away from open flame.
Care Instructions
Gentle wash at 30°C. No bleaching. No drying machine. No ironing. No dry cleaning.
![]()
Avoid frequent washing, but if required, wash gently and do not do bleaching. Avoid exposure to the sun.
Soccer Ball & Pump
Quick Start Guide

Detach needle from the storage space within the hand pump.

Using the tips of your fingers, thread the needle onto the end of the hand pump until it stops twisting.

Scan the soccer ball for the valve stem hole to insert the needle. Moisten the needle tip and valve stem with water.

Insert the needle tip into the hole. Hold the base of the pump with one hand while you pull up on the handle. Push down on the handle to force air into the ball. Repeat pumping until the soccer ball is inflated.
Helpful Hints
- Moisten the needle tip and valve stem with water. A dry needle can cause damage to the ball and the needle itself.
- Inflating your ball slowly allows the bladder to conform its shape to the outer cover. Inflating too quickly can lead to bladder damage resulting in a warped ball.
- If you want your soccer ball to have a long and healthy life, keep it well-inflated and well-maintained.
- Never sit or stand on your soccer ball. This puts too much pressure on the stitching of the ball and can cause it to become warped or eventually burst.
- Between uses, it is recommended you store your soccer ball in a dry airy room-temperature location. Don’t leave it outside exposed to the elements.